Using the EcoFlex Laser Cutter Engraver well begins with preparation, not pressing the start button. This guide explains how to inspect the machine, position materials, set focus, choose suitable power and speed, and review each result. The correct settings depend on the material, thickness, surface finish, lens condition, and machine configuration. Never assume a setting works twice.
Laser educator Russ Sadler often shares a practical principle: “Measure twice, focus once.” That advice fits every EcoFlex Laser Cutter Engraver project. A small focus error can soften fine lettering. Excessive power can darken edges, melt details, or create unnecessary smoke. Begin with a small test grid on scrap material. Mark each square clearly. Record the settings in a simple log.
Safety remains part of the workflow. Use approved ventilation, keep the enclosure closed, inspect the exhaust path, and follow the manufacturer’s instructions. Do not process unknown plastics or coated materials. Some surfaces can release hazardous fumes. Protective equipment may support safety, but it does not replace proper extraction or supervision.
My own process is not always perfect. I sometimes rush the first test and regret it later. That mistake is useful, if it becomes a documented lesson. This introduction will help you build a repeatable routine, from material checks to final cleanup. Expect adjustment. Good engraving is rarely achieved by guessing.
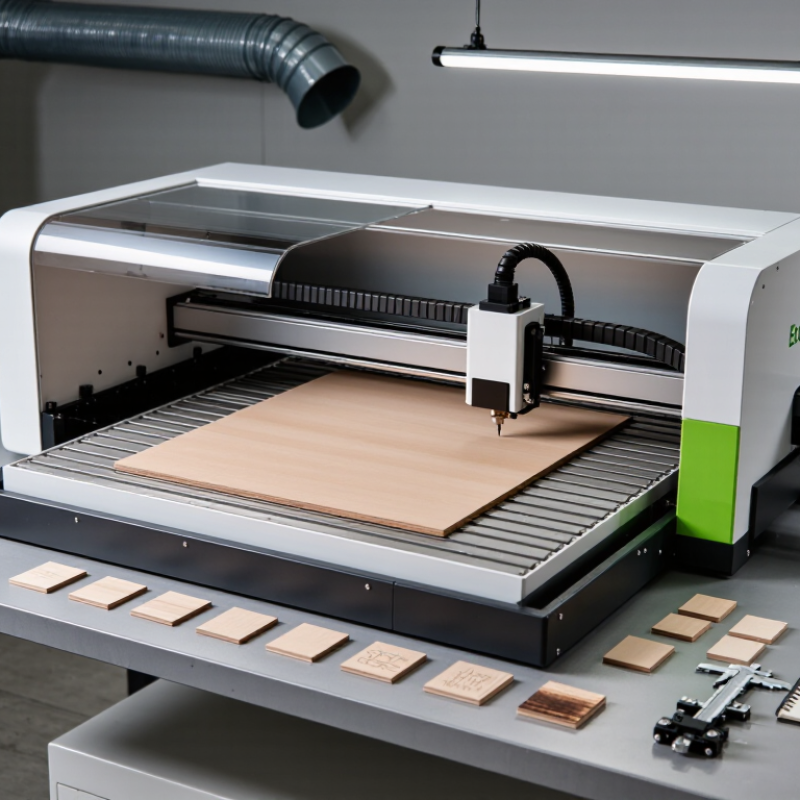
An eco-conscious laser cutter engraver uses a focused light beam to remove, darken, or shape material. The beam travels through a lens and concentrates energy onto a tiny surface area. Motion rails guide the laser along programmed paths. Software converts a drawing into lines, fills, and controlled passes.
Its main features usually include adjustable speed, power control, focusing support, ventilation, and an air-assist system. Speed changes exposure time. Power controls the beam’s intensity. Focus matters greatly. A slightly raised lens can create pale marks or uneven cuts. I learned that small setup errors often appear as large quality problems.
Wood, paper, acrylic, leather, and coated surfaces may respond differently. Test a small sample first. Always inspect the material’s safety information. Some plastics release dangerous fumes and should not be processed. Keep the work area clear, secure the material flat, and check the exhaust before operation. Protective measures are essential, even during short jobs.
In practice, clean lenses and stable rails improve consistency. I sometimes expect one setting to work perfectly, but materials vary between batches. That assumption needs correction. Record each test, including speed, power, focus height, and pass count. These notes build a reliable process and make future results easier to repeat.
Preparing a laser cutter engraver begins with a clean, controlled workspace. Place the machine on a stable, level surface with enough clearance around ventilation openings. Keep paper, solvents, and loose fabric away from the cutting area. Good airflow matters, especially when engraving wood or acrylic. Never leave an active job unattended.
Choose materials with verified composition and clear supplier information. Untreated plywood, cardboard, leather, and suitable acrylic can produce different edges and odors. Avoid unknown plastics, especially materials that may release corrosive fumes. Wipe dust from the bed before loading each sheet. Small debris can affect focus and create uneven cuts. It happens.
Prepare the design file before opening the machine software. Use vector paths for cutting and filled shapes for engraving. Check the document units, page size, line colors, and stroke widths. Remove duplicate paths, open contours, and hidden objects. A simple test grid can reveal how speed, power, and passes affect the material. Label each sample carefully.
Set the focus height using the material’s actual thickness, not an estimate. Secure lightweight sheets with magnets or approved weights outside the cutting path. Watch the first few minutes for excessive smoke, flare-ups, or incomplete movement. Record successful settings in a work log, but question old values when the material changes. My own early mistake was trusting a familiar setting on a denser sheet. The result looked acceptable, yet the edges were darker and rougher than expected. Calibration deserves patience.
For a laser cutter engraver, power and speed must match the material, thickness, and laser wattage. I begin with a small test grid instead of trusting a single setting. Higher power cuts deeper, while slower speed increases heat exposure. Too much heat can create dark edges or unwanted warping. My first test was often too strong.
Use low power for surface engraving, then increase it gradually for clearer contrast. For cutting, reduce speed in small steps before making large power changes. Keep the focus point on the material’s actual surface. A misplaced focus can produce wide lines and uneven cuts. Check the lens and bed before each project.
Air assistance helps remove smoke and cool the cutting area. Use moderate airflow for engraving, because excessive air may scatter fine residue. Stronger airflow is usually useful during cutting, especially with thicker sheets. Still, it cannot fix poor focus or unsuitable settings. Test one variable at a time. That takes longer.
Record the material, thickness, power, speed, focus position, and air level. These notes become valuable when the same material behaves differently later. Always use approved, clearly identified materials and suitable ventilation. Never leave an operating laser unattended. Also, avoid unknown plastics, since their fumes may be hazardous. Settings are not permanent rules; humidity, surface coating, and machine condition can change the result.
Starting settings for common 3 mm materials on a general 40–60 W CO₂ laser system. Actual results vary with lens condition, material density, and machine calibration.
Use the power and speed values as test-cut starting points rather than final production settings. Set focus at the material surface, use stronger air assistance for cutting or smoky materials, and adjust one variable at a time after a small test grid.
| Material | Focus position | Air assistance | Typical use |
|---|---|---|---|
| Birch plywood | Material surface | Medium to high | Cutting and light engraving |
| Cast acrylic | Material surface | Low to medium | Polished edge cutting |
| Corrugated cardboard | Material surface | Low | Fast engraving and shallow cutting |
| Anodized aluminum | Material surface | Low | Surface marking |
Set the machine on a stable, nonflammable surface with clear airflow around it. Check the lens, bed, exhaust hose, and emergency stop before switching it on. Use only materials approved by the manufacturer. Never cut unknown plastics, PVC, or coated materials that may release harmful fumes. Secure thin plywood or fabric flat on the honeycomb bed.
Choose vector mode for cutting and raster mode for surface engraving. Measure the material with calipers, then set the correct focal height. Create a small test grid with different speeds and power levels. Watch the first pass closely. A clean edge usually needs steady air assistance, not maximum power. Keep the lid closed, and stop the machine if flames grow, smoke increases, or the odor changes sharply.
For detailed engraving, lower the power and increase the speed gradually. For cutting, make several controlled passes instead of one aggressive pass. Remove residue with a soft brush after the material cools. Inspect the underside for scorching and check whether corners cut fully. My early tests often looked acceptable from above, but hidden soot revealed excessive heat. I now record settings beside each sample. That small habit prevents repeated mistakes. Keep the workspace attended throughout operation and store finished pieces away from heat.
Cleaning, Maintenance, Safety Checks, and Troubleshooting
Before operating a desktop laser cutter engraver, inspect the enclosure, lid, interlocks, exhaust hose, and emergency stop. Keep the work area clear of paper scraps and flammable dust. Never leave an active job unattended. Use only verified materials, because some plastics can release toxic or corrosive fumes. Check the material safety data sheet when uncertain, and follow local workplace requirements.
Clean the lens and mirrors with approved optical wipes, using gentle strokes. Residue can scatter the beam and produce uneven engraving. Remove ash from the cutting bed after every session. Wipe the rails carefully, then apply only the lubricant recommended by the equipment manual. Inspect belts, cables, cooling lines, and air-assist tubing for cracks. A loose connector may look harmless, but it can interrupt a long job.
Troubleshooting should begin with simple observations. If edges appear dark, reduce power, increase speed, or improve air assistance. If lines shift, check belt tension and rail cleanliness. Poor cutting may also come from warped material or a dirty lens. I once blamed the settings too quickly; the real problem was weak exhaust airflow. That mistake reminded me to test one variable at a time. Stop immediately if you notice unusual smoke, burning odors, sparks, or abnormal sounds. Disconnect power only when it is safe, and arrange qualified service for electrical or optical faults.
| Area | Recommended Frequency | Task or Check | Correct Procedure and Acceptance Criteria | If a Problem Is Found |
|---|---|---|---|---|
| Workspace Safety | Before every use | Inspect the work area and machine enclosure. | Keep the surrounding area clean and dry. Remove paper scraps, dust, solvents, aerosols, and other combustible materials. Keep ventilation openings unobstructed. | Stop operation and clear the area before powering on the machine. |
| Personal Protection | Before every use | Use appropriate protective equipment and operating procedures. | Wear safety glasses suitable for the machine’s laser wavelength when required by the manufacturer. Tie back long hair, avoid loose clothing, and never leave the machine unattended while cutting. | Do not operate until the required protection and supervision are available. |
| Enclosure and Interlocks | Before every use | Check doors, covers, viewing windows, and safety interlocks. | Confirm that the enclosure is intact and doors close fully. Test the interlock only according to the manufacturer’s instructions; the laser must not fire when a safety door is open. | Disconnect power and arrange qualified service. Never bypass or disable an interlock. |
| Emergency Stop | Before every use | Verify the emergency-stop button and restart behavior. | Ensure the button is accessible and not damaged. Follow the approved test procedure to confirm that laser emission and motion stop when the emergency stop is activated. | Remove the machine from service if the emergency stop does not work correctly. |
| Exhaust and Filtration | Before every use | Check the exhaust fan, ducting, filters, and airflow. | Start the exhaust system before cutting. Confirm that airflow is present, ducts are connected, and no smoke or odor is escaping into the room. | Stop the job, inspect for blockages or loose connections, and replace saturated filters before resuming. |
| Material Selection | Before every use | Verify that the material is suitable for laser processing. | Use materials with known composition and supplier safety information. Do not process PVC, vinyl, unknown plastics, halogen-containing materials, or materials that may release corrosive or toxic gases. | Do not cut or engrave the material until its composition and hazards are confirmed. |
| Cutting Bed | Daily | Clean the honeycomb, knife, or slat bed. | Remove ash, resin, and loose debris with a suitable vacuum or soft brush after the machine is powered down. The bed should be flat, stable, and free of buildup that could restrict airflow. | Clean or replace damaged bed components. Do not operate if the workpiece cannot sit level. |
| Optics and Lens | Daily or as needed | Inspect the focus lens, mirrors, and protective windows if fitted. | Look for smoke residue, cracks, chips, cloudiness, or discoloration. Clean only with approved lens tissue and optical cleaner; use gentle strokes and allow the optic to dry completely. | Replace damaged or permanently stained optics. Do not touch optical surfaces with bare fingers. |
| Machine Exterior | Daily | Wipe external surfaces and remove dust. | Switch off and isolate power before cleaning. Use a soft, slightly damp lint-free cloth. Keep liquids away from electrical components, connectors, and ventilation openings. | Dry the machine completely before reconnecting power. |
| Linear Rails and Guides | Weekly | Inspect and clean motion rails, guideways, and rollers. | Remove dust and residue with a lint-free cloth. Apply only the lubricant specified for the machine, using a small amount; excess lubricant attracts abrasive dust. | Investigate grinding, binding, or uneven motion before continuing production. |
| Belts and Drive System | Weekly | Check belts, pulleys, couplings, and fasteners. | Belts should be correctly seated, free from fraying, and neither excessively loose nor over-tightened. Pulleys and mounting screws should be secure. | Stop using the machine if a belt slips, jumps, or shows damage. Adjust or replace parts according to the service manual. |
| Focus and Alignment | Weekly or after service | Confirm focus height and beam alignment. | Use the manufacturer-approved focus gauge or method. Perform alignment checks only with the correct procedure and qualified personnel; the beam path must remain enclosed whenever possible. | Uneven cuts or changing spot position require calibration or professional service. |
| Cooling System | Before every use, if applicable | Check coolant level, temperature, flow, tubing, and leaks. | Use the coolant type and concentration specified for the machine. Confirm normal flow and temperature before enabling the laser. Tubes must be clear, connected, and free from kinks. | Do not fire the laser with low flow, overheating, visible leaks, or an active cooling alarm. |
| Electrical System | Monthly | Inspect the power cord, plug, grounding, and connectors. | Look for cuts, heat damage, loose plugs, exposed conductors, or unusual odors. The machine should be connected to a properly grounded outlet and protected by suitable electrical protection. | Disconnect power and have electrical faults handled by a qualified technician. |
| Fire Prevention | Before every use | Confirm fire-control readiness. | Keep an appropriate fire extinguisher nearby, know the emergency shutdown procedure, and monitor the first test cut of unfamiliar materials. A small flame that does not extinguish immediately requires stopping the job. | Stop the laser, switch off power if safe, keep the enclosure closed if appropriate, and follow the site emergency plan. |
| Software and Job Setup | Before every use | Review the job file, origin, scale, speed, power, and passes. | Run a frame or outline preview with the laser disabled when possible. Secure the material, confirm the correct focus, and use a low-power test on scrap before processing valuable material. | Cancel the job and correct the file or settings if the preview does not match the intended work area. |
| Weak or Incomplete Cut | Troubleshooting | Check focus, optics, material, speed, power, and airflow. | Confirm correct focal distance, clean optics, suitable material thickness, adequate exhaust airflow, and appropriate settings. Multiple passes may be required for approved materials. | If performance remains inconsistent, stop operation and request alignment, power-output, or cooling-system inspection. |
| Uneven Engraving | Troubleshooting | Inspect the workpiece, focus, motion system, and image settings. | Ensure the material is flat and secure. Check for a level bed, correct focus across the work area, clean optics, stable motion, and suitable image resolution or scan interval. | Service the rails, belts, or alignment system if banding or positional errors persist. |
| Smoke or Odor in the Room | Troubleshooting | Stop processing and inspect the exhaust path. | Turn off the laser, keep ventilation running if safe, and check fan operation, duct connections, filters, and material suitability. Do not rely on odor alone to judge safety. | Do not resume until the exhaust system is working and the material is confirmed safe. |
| Overheating or Cooling Alarm | Troubleshooting | Check coolant flow, temperature, ventilation, and ambient conditions. | Stop the laser and allow the system to cool. Inspect coolant level, tubing, pump operation, radiator airflow, and blocked vents. Use the recommended operating temperature range from the machine manual. | Do not bypass the alarm. Arrange qualified service if the alarm returns after basic checks. |
| Unexpected Motion or Noise | Troubleshooting | Stop the job and inspect the motion path. | Check for obstructions, loose material, debris on rails, belt damage, skipped steps, and incorrect homing or origin settings. Keep hands clear of moving parts. | Disconnect power before mechanical inspection and obtain service for repeated errors. |
| End-of-Job Shutdown | After every use | Complete a safe shutdown and housekeeping routine. | Turn off the laser source, allow the exhaust to clear smoke, remove finished material and debris, inspect for smoldering residue, and shut down ancillary systems according to the manual. | Report unusual noise, odor, heat, alarms, or visible damage before the next operating cycle. |
| Maintenance Records | Monthly | Record cleaning, inspections, faults, and replacement parts. | Document dates, machine hours, materials processed, alarms, corrective actions, and technician work. Keep the operating and service manuals accessible. | Escalate recurring faults instead of repeatedly resetting or bypassing safety systems. |
A focused light beam removes, darkens, or shapes material. A lens concentrates energy onto a tiny surface area. Motion rails follow programmed paths. Software converts drawings into lines, fills, and controlled passes.
Wood, paper, acrylic, leather, and coated surfaces may respond differently. Check each material’s safety information first. Avoid unknown plastics and materials that may release dangerous fumes. Test a small sample.
Power controls beam intensity, while speed controls exposure time. Higher power can cut deeper. Slower speed adds heat. Excess heat may cause dark edges or warping. My first test was too strong.
Create a small grid with several speed and power combinations. Change one variable at a time. Record material, thickness, power, speed, focus, and air level. Test small areas.
Keep the focus point on the material’s actual surface. A raised or misplaced lens can create pale marks, wide lines, or uneven cuts. Focus is unforgiving. Check the lens and bed before each project.
Air assistance removes smoke and cools the cutting area. Moderate airflow suits engraving. Stronger airflow often helps during cutting. Excessive airflow may scatter fine residue. Air cannot fix poor focus.
Place the machine on a stable, nonflammable surface. Check the lens, bed, exhaust hose, ventilation, and emergency stop. Secure thin materials flat. Keep the lid closed. Never leave the machine unattended.
Clean lenses and stable rails usually improve results. Use several controlled passes instead of one aggressive pass. Inspect both sides after cooling. Hidden soot can reveal excessive heat. My earlier assumptions were not always reliable.
The EcoFlex Laser Cutter Engraver is designed to perform both precise engraving and controlled cutting by directing a focused laser beam across a selected material. This guide explains its main features, operating principles, and the importance of preparing a clean, stable workspace. Before starting, users should choose suitable materials, secure them properly, and create compatible design files with clear dimensions and line settings. Proper ventilation and safe working habits are also essential.
For reliable results, adjust laser power, travel speed, focus, and air assistance according to the material’s thickness and surface. The operating process includes positioning the material, checking the design boundaries, focusing the laser, running a test pattern, and completing the cutting or engraving task under supervision. After use, clean the lens and work area, inspect moving parts and air pathways, and follow routine maintenance procedures. The guide also outlines practical safety checks and troubleshooting steps for issues such as uneven engraving, incomplete cuts, excessive smoke, or misalignment.